Understanding WatchKit Complications
WatchKit complications can be a little confusing at first glance. Here’s a guide to get started with them.
If you’re just getting started with creating a WatchKit app, checkout Getting Started with building a WatchKit app for Apple Watch, otherwise, you’ve probably created a WatchKit app and are looking for some guidance on how to use complications to enhance your app’s user experience.
When you created your WatchKit app, you’ve probably seen a file called ComplicationController.swift. This file is basically your AppDelegate.swift equivalent for your WatchKit Complications. This controller contains all of the functions for determining how your complications should look, and behave under different circumstances. You’ll also find that your Assets in your “WatchKit Extension” contains a folder called Complication that has a collection of image sets named after complication types. These image sets are the default images that are shown on your complication unless you intentionally serve something different in your ComplicationController. I recommend checkout out Apple’s documentation for the definition of each complication type to get a better understand of what they all are/look like.
After you’ve gotten an understanding of what each complication looks like, it becomes a lot easier to translate what you’re looking to achieve into code.
When it comes to writing code for your complications, there are two main ways that I believe you should write your complications.
Using CLKComplicationTemplates from Apple
The first way to write complications is to use the Templates that Apple provides for us in the form of CLKComplicationTemplate. Let’s look at an example ComplicationController from my WatchKit app Ignis - Fuel Price Tracker
import SwiftUI
import ClockKit
class ComplicationController: NSObject, CLKComplicationDataSource {
// MARK: - Timeline Population
func getCurrentTimelineEntry(for complication: CLKComplication, withHandler handler: @escaping (CLKComplicationTimelineEntry?) -> Void) {
// Call the handler with the current timeline entry
if let ctemplate = makeTemplate(complication: complication) {
let entry = CLKComplicationTimelineEntry(date: Date(), complicationTemplate: ctemplate)
handler(entry)
} else {
handler(nil)
}
}
// MARK: - Other complication functions hidden.
}
extension ComplicationController {
func makeTemplate(complication: CLKComplication) -> CLKComplicationTemplate? {
switch complication.family {
case .graphicCorner:
return makeGraphicCornerTextView()
case .utilitarianSmallFlat:
return makeUtilitarianSmallFlat()
case .utilitarianLarge:
return makeUtilitarianLarge()
case .modularSmall:
return makeModularSmall()
case .modularLarge:
return makeModularLarge()
default:
return nil
}
}
func makeGraphicCornerTextView() -> CLKComplicationTemplate {
var textDisplay = "No Data"
if let complicationData = PersistenceManager.shared.complicationDisplayData {
textDisplay = complicationData.priceDisplayString
}
let complication = CLKComplicationTemplateGraphicCornerTextImage(
textProvider: CLKSimpleTextProvider(text: textDisplay),
imageProvider: CLKFullColorImageProvider(fullColorImage: UIImage(systemName: "fuelpump.circle.fill")!)
)
return complication
}
// MARK: - Other complication functions hidden
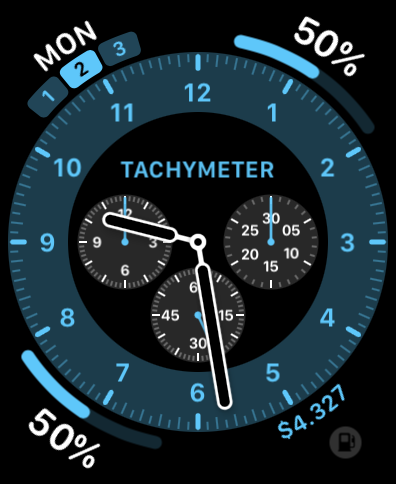
}As you can see above, I’ve extended my ComplicationController with a function called makeTemplate() which takes a CLKComplication and returns a CLKComplicationTemplate?. In this function, I have a switch statement to determine what content I should serve for my complication based on the complication’s family. For our example above, we can look at my function makeGraphicCornerTextView, this function returns a CLKComplicationTemplate which is a generic type for a ClockKit complication, this means that as long as a CLKComplication template conforms to this, we can return our implementation of the template. CLKComplicationTemplate is an open class meaning it is accessible and subclassable, which is why we are able to use it here. From here, apple provides complication templates for all of the complication types that conform to CLKComplication and allow us to enter our relevant information to be displayed on the watch face. For my graphic corner text view, I’m displaying fuel price data, so I use a CLKSimpleTextProvider to display my price string, and an image from SFSymbols with CLKFullColorImageProvider to display a fuel pump logo. Below you’ll see in the bottom right corner an example of my complication displayed.
Customizable Complications using SwiftUI
Another way to write complications if you want to achieve more customizable functionality than what Apple initially provides is to use CLKComplication view templates with SwiftUI to serve more information rich content. Lets look at our ComplicationController example again. This time without our Apple provided complication templates.
import SwiftUI
import ClockKit
class ComplicationController: NSObject, CLKComplicationDataSource {
// MARK: - Timeline Population
func getCurrentTimelineEntry(for complication: CLKComplication, withHandler handler: @escaping (CLKComplicationTimelineEntry?) -> Void) {
// Call the handler with the current timeline entry
if let ctemplate = makeTemplate(complication: complication) {
let entry = CLKComplicationTimelineEntry(date: Date(), complicationTemplate: ctemplate)
handler(entry)
} else {
handler(nil)
}
}
// MARK: - Other complication functions hidden.
}
extension ComplicationController {
func makeTemplate(complication: CLKComplication) -> CLKComplicationTemplate? {
switch complication.family {
case .graphicRectangular:
return CLKComplicationTemplateGraphicRectangularFullView(ComplicationViewRectangular())
default:
return nil
}
}
// MARK: - Other complication functions hidden
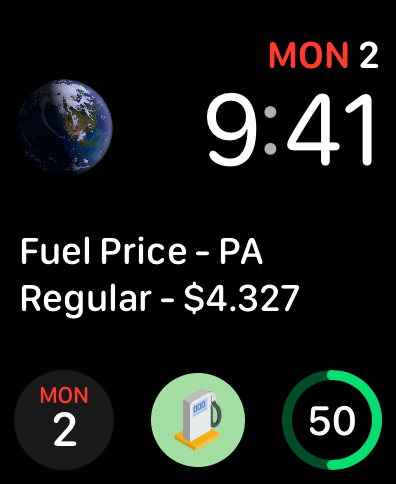
}Looking at this snippet, instead of serving something like our apple template examples, we’re serving a new type of template which takes a SwiftUI view as a parameter. Our SwiftUI view appears as shown below.
import SwiftUI

struct ComplicationViewRectangular: View {

    @State private var complicationData: ComplicationDisplayModel?

    var body: some View {
        HStack {
            if let complicationData = complicationData {
                VStack(alignment: .leading) {
                    Text("Fuel Price - \(complicationData.stateAbbreviation)")
                    Text("\(complicationData.fuelType) - \(complicationData.priceDisplayString)")
                }
                Spacer()
            } else {
                Text("Not watching any fuel prices yet.")
            }
        }
        .onAppear {
            complicationData = PersistenceManager.shared.complicationDisplayData
        }
    }
}
As we see in the example above, this is an ordinary SwiftUI view with two Text elements that are displayed when complication data is present, and one Text element when complication data hasn’t been set up yet for the user. With this, we’re serving our custom SwiftUI view as a CLKComplicationTemplate, and it’s as simple as that! Our complication will display as shown below.
Refreshing Complication Data from your App
After you have your complications setup, there will most likely be times in your app where you need to refresh the data that is displayed in your complication after certain events. This code snippet below allows us to reload the timeline for our active complications. Be careful when calling this, as I believe there is a limit on how many times you can actively refresh your complication this way.
/// Reload any active complications
let complicationServer = CLKComplicationServer.sharedInstance()
if let activeComplications = complicationServer.activeComplications {
    for complication in activeComplications {
        complicationServer.reloadTimeline(for: complication)
    }
}
Wrapping Up
WatchKit Complications are a great way to improve your app’s user experience and provide them with more value out of your app. As we’ve seen in the examples above, it’s not only extremely easy to get started developing a WatchKit app, but it’s also relatively easy to get started with serving information rich complications using complication templates, and even SwiftUI views! If you’ve enjoyed the information in this article, please consider supporting me through downloading my standalone WatchKit app Ignis - Fuel Price Tracker for your Apple Watch today!
Subscribe to Norfare
Get the latest posts delivered right to your inbox